Nobara New User Guide and General Usage Guidelines:
¶ Installation:
-
Burn the ISO image file to a USB drive (at least 8 GB). For this, Ventoy is recommended for both Windows and Linux users. Once downloaded, extract the files to a folder and run Ventoy2Disk.exe or VentoyGUI.x86_64 (you may need to make it executable) as appropriate for your system. Once you have installed Ventoy on USB, just copy the ISO file to that USB root directory. Ventoy allows easily replacing old image or copying multiple ISOs to same bootable USB without formatting it again. Read detailed Ventoy usage instructions here.
Fedora Media Writer can also be used for ISOs. For Windows users, Rufus can also be used, so long as it is set to GPT and DD-mode (newer versions of Rufus should set this by default.) BalenaEtcher is no longer recommended as it appears to have issues writing the Nobara ISO.
Don't just unplug the USB or reboot/turn off PC immediately after copying, use Safe Eject.
-
(Optional) To make sure your installation ISO is intact, it's recommended to verify the sha256sum checksum not only after download, but also on the USB after safely ejecting and inserting Ventoy USB back in. It should match the sha256sum provided on the website.
-
Disable Secure Boot in your system BIOS. Nobara's kernel is not compatible with it. Additionally your system should be using UEFI (most systems made within the last 25+ years are on UEFI). It's recommended to disable CSM in BIOS to run in UEFI-only mode).
-
Boot to the USB stick. The first thing you should see is the GRUB boot menu:
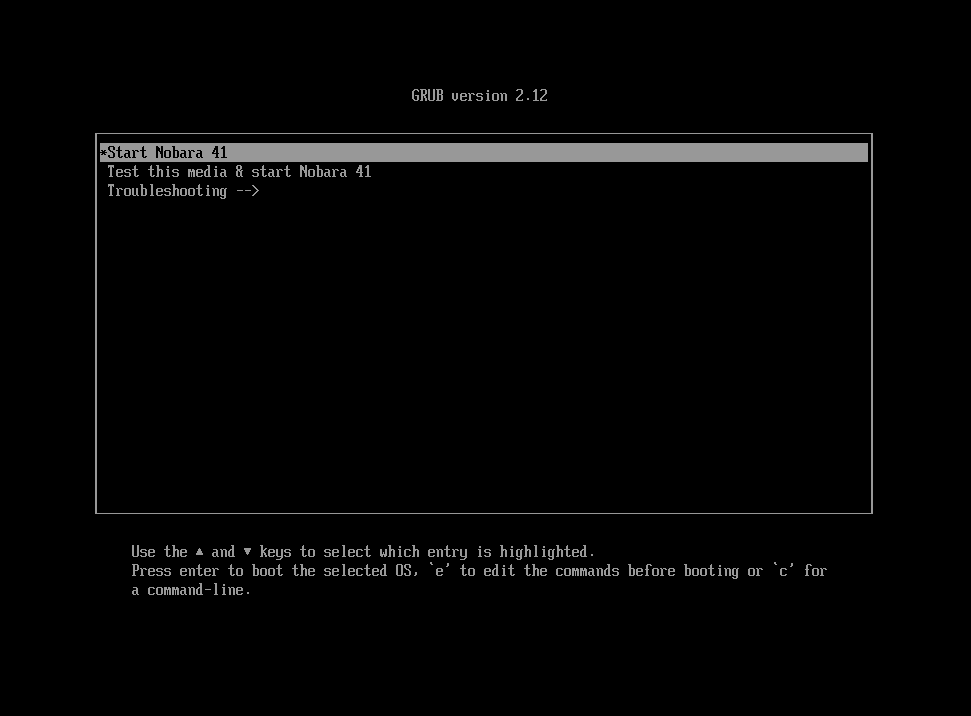
You can choose either option, both will start the live environment with installer.
¶ Nvidia users:
Before installing Nobara, make sure that your GPU is supported!
Each ISO can be used for both standard AMD/Intel installations and NVIDIA installations. A separate NVIDIA image is no longer required, just make sure to select checkbox in the installer for Nvidia drivers.
If you have installed Nobara on a PC with Nvidia GPU, but forgot to select the driver checkbox during installation process, Nvidia driver can be installed later via Nobara Driver Manager or nobara-driver-tui.
¶ Installation (continued):
- In the
Userssection of the installer, if you do not have a keyboard device, you can click the box in the top right corner to toggle a virtual keyboard:
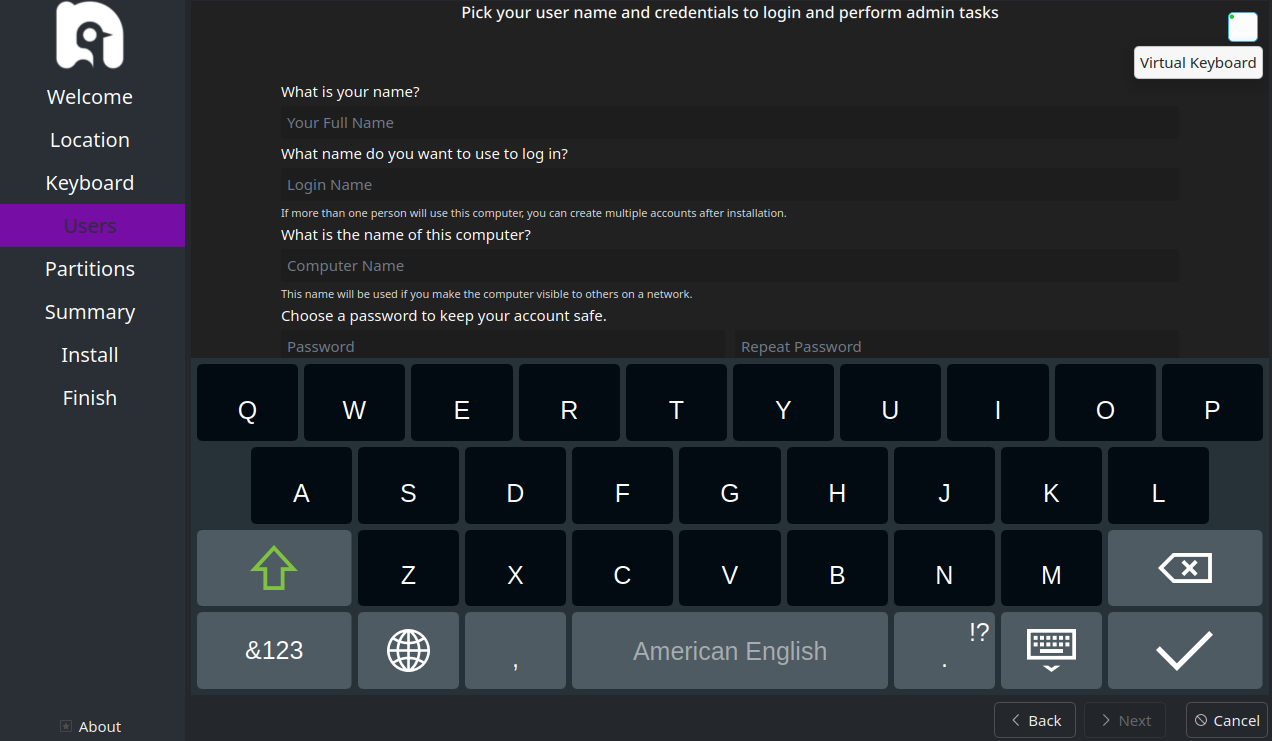
- In the partition section of the installer, the best/easiest choice is to select 'Erase Disk and' 'Swap (with Hibernate)', 'btrfs'
¶ Windows users:
¶ It is NOT recommended to attempt dual booting on the same drive as Windows because only 1 EFI partition can exist on the drive, and Windows by default does not create a large enough EFI partition for multiple operating systems. Instead it is recommended to install Nobara either on a new drive, or on a drive which does not currently have an EFI partition.
¶ Custom partitions:
Nobara requires both /boot and /boot/efi partitions by default in addition to / (root):
https://wiki.nobaraproject.org/general-usage/troubleshooting/mounting-automounting-disk-drives
This means you need (at least) 3 partitions. One for /boot. One for /boot/efi. One for root (/). You cannot nest /boot inside of root (/) because Nobara uses btrfs by default and GRUB cannot access btrfs subvolumes.
¶ First steps after installation:
First and foremost, open the Nobara Welcome App. On the left side click 'First Steps'.
- Run the Nobara System Updater (via DNF App Center):
There are several ways to run the Nobara System Updater:
https://wiki.nobaraproject.org/general-usage/troubleshooting/update-system
In the Welcome App we will just click the Launch button for 'Update my system'.
The updater is designed to update itself, it may close and re-open for this.
If you believe the updater has hung/stuck for a very long period of time, you can close the updater then open konsole or gnome-terminal then update the updater manually:
sudo dnf update nobara-updater --refresh
Then re-run the updater.
Additionally -- it is possible to also run nobara-updater directly from konsole/terminal in case you are connected over SSH or in a non-GUI environment:
nobara-sync
More troubleshooting tips for the updater:
https://wiki.nobaraproject.org/general-usage/troubleshooting/updating-troubleshooting
IMPORTANT: You will want to say YES to the Media Codec prompt.
It will install all required packages for encoding/decoding support for H264/H265/x264/x265 as well as related ffmpeg packages. These are needed for both video recording and video playback support.
- Install drivers:
Next in the Nobara Welcome App click 'Launch' for 'Open Driver Manager'.
¶ Nvidia users:
Normally, the installation ISO already installed default Nvidia drivers if you selected the appropriate checkbox, so you do not need to touch driver manager after installtion.
Provided driver options are Production (default), Beta and New Features. You can switch between them from the driver manager.
If the nvidia-driver is already installed and you feel something may not be working correctly, you can click the 'Uninstall' button, then reinstall with the 'Install' button.
If you are not able to open the Nobara Welcome App, Nobara Driver Manager, or any other GUI, it is likely your Nvidia drivers are not fully installed correctly. Primary indicator of that would be nvidia-smi command not returning a status table.
In this case, Nobara Driver Manager is able to purge + install nvidia drivers both via GUI or from CLI via nobara-driver-tui.
After it finishes, reboot the system.
After rebooting, open the Nobara Driver Manager to check and verify nvidia-driver is installed.
If you need CUDA support for things like DaVinci Resolve, click the install button for cuda-devel. It's used for computing stack and local AI model support.
cuda-devel is OPTIONAL and NOT required for your GPU to work.
IMPORTANT NOTE:
Users of Nvidia Pascal generation 10 series cards -- meaning your 1080ti/1080/1070/1060/1050ti/1050/1030 and older -- Your cards are NOT supported by the current Nvidia driver! We DO NOT ship or support rpmfusion or other legacy (580 or older) Nvidia drivers for older GPU versions.
Please see the Nobara wiki entry for more details:
https://wiki.nobaraproject.org/graphics/nvidia/supported-gpus
¶ AMD/Intel users:
For AMD you will see rocm-meta. rocm-meta is OPTIONAL and NOT required for your GPU to work.
If you need ROCm support for things like blender or DaVinci Resolve, click the install button for rocm-meta
For AMD and Intel you will see mesa-vulkan-drivers-git. mesa-vulkan-drivers-git is OPTIONAL and NOT required for your GPU to work.
The system comes with stable Vulkan drivers that come with every Mesa version release for both AMD and Intel. Sometimes a fix may be added upstream for game titles or applications and that fix may not yet be in any current Mesa release. If you find a fix you need you can click the install button for mesa-vulkan-drivers-git. These git version drivers are built regularly (roughly every two weeks) from upstream git (bleeding-edge). Just be aware you may encounter other bugs with them. If you encounter bugs you can simply use the Nobara Driver Manager to remove them and it will switch back to the stable versions.
¶ Xbox Wireless USB device users:
If you have the Xbox Wireless USB device plugged in, you will see an option for the 'xone' driver. You will need to install this for the device.
¶ ASUS device users:
If you have an ASUS device you will see an option for asusctl. You will want to install this for basic things like fan control and rog control center:
https://gitlab.com/asus-linux/asusctl#asusctl-for-asus-rog
¶ Additional drivers:
There are also driver options provided for Sound Blaster audio firmware and Broadcom Wifi/BT chips if they are detected.
¶ First steps after installation (continued):
- Configure automatic mounting of additional drives:
Many users have additional disk drives containing game files or other files they wish to access across multiple OS installs.
By defualt, other drives are mounted at /run/media//.
If you need to enable/disable auto-mounting of a partition, you can open the Nobara Drive Mount Manager and check/uncheck the box for the drive, then reboot.
For more information please see the Nobara Wiki entry (it refers to outdated tool version):
https://wiki.nobaraproject.org/general-usage/troubleshooting/mounting-automounting-disk-drives
¶ First steps after installation (continued):
- Installing applications:
¶ For gaming, Nobara already comes equipped natively with all of the major packages you might need:
Steam
Lutris (for non-steam games)
Gamescope
Gamemode
MangoHud
Goverlay (used to manage MangoHud)
umu-launcher (for non-steam games)
protonplus (for installing GE-Proton)
-
It is recommended on a fresh install to open ProtonPlus and install the latest version of GE-Proton, then restart steam.
-
To use GE-Proton with a non-steam game in Lutris, right click the game in your Lutris library, go to Configure. Click the 'Runner options' tab and select
GE-Proton (Latest)as the runner. Lutris will then automatically use the latest GE-Proton with umu-launcher for running that game. -
To use MangoHud with a non-steam game in Lutris, right click the game in your Lutris library, go to Configure. Clith the 'System options' tab and enable the 'FPS counter (MangoHud)' toggle.
-
To use GE-Proton with a steam game, right click the game in your steam library, go to Properties -> Compatibility, Check the box, and set GE-Proton9-22 as the compatibility tool.
-
To use MangoHud with a steam game, right click the game in your steam library, go to Properties -> General, In LAUNCH OPTIONS box type
mangohud %command% -
To configure MangoHud use the Goverlay application.
Using NTFS drive for Steam game library (especially if you plan to co-use it from Windows as well) is NOT RECOMMENDED. But it's possible. Read more about it here: https://github.com/ValveSoftware/Proton/wiki/Using-a-NTFS-disk-with-Linux-and-Windows.
If you want to have new external drive (or format old one) for gaming library, good filesystem choice would be ext4. After making new partition you might need to chown the drive after creating and mounting it for access without password (sudo chown $USER:$USER /your/drive/mountpoint).
¶ For streaming and video editing:
There are just three packages Nobara/Fedora provides that are recommended to be installed natively (NOT via flatpak):
Blender
Kdenlive
OBS Studio
The reason for this is because the native Nobara/Fedora provided versions of these packages have full hardware support for things like ROCm and CUDA as well as hardware encode/decode support via VAAPI and NVENC in applications that support them.
OBS Studio specifically from Nobara also comes with several plugins pre-installed that standard OBS from flatpak does not:
obs-studio-plugin-browser (Browser Source)
obs-studio-plugin-backgroundremoval (Camera Background Removal)
obs-studio-plugin-media-playlist-source (video/audio playlist aka VLC Playlist)
obs-studio-plugin-distroav (NDI)
obs-studio-plugin-vkcapture (Vulkan Capture for both 64 and 32 bit)
Additionally, Nobara comes with the OBS Gamecapture vulkan environment variable enabled globally, meaning you dont have to set any environment variables when capturing Vulkan game footage.
To install the Nobara native version of OBS and its plugins you can do so via the 'Recommended Additions' section of the Nobara Welcome app, or search for obs-studio in the Nobara Package Manager under the 'Packages' tab.
¶ For DaVinci Resolve:
We have created a special runtime and install/update tool to make installing and updating DaVinci Resolve as easy as possible on Nobara. Please see the following Nobara wiki documentation:
https://wiki.nobaraproject.org/general-usage/additional-software/davinci-resolve
¶ For video/audio calls and discussion:
We recommend installing the beta 'Canary' flatpak version of Discord, as it's currently the only version of Discord that supports screen capture for streaming/calls.
To install beta 'Canary' flatpak version of Discord you can do so via the 'Recommended Additions' section of the Nobara Welcome app, or search for Discord Canary in the Nobara Package Manager under the 'Flatpaks' tab.
¶ For all other software:
Flatpaks:
To ensure the system stays in a clean and stable state, we do not recommend installing other further system packages.
Instead we recommend installing the Flatpak versions of any packages you may want.
However, for installing system RPM packages from enabled repositories, you can use DNF App Center, same one as for the System Updates.
For information how to install and/or manage Flatpaks please see the following Nobara wiki page:
https://wiki.nobaraproject.org/general-usage/flatpaks/flatpak-package-managers
Remember that Nobara Updater (DNF App Center) does not update flatpaks. Only exception is full CLI updater mode:
nobara-sync --all
- Please note when installing flatpaks you will be presented with the option to install under 'System' or 'User'. It is recommended to only install Flatpaks under 'User'. Can be either, but it's bad idea to use both install types as that would casue a large amount of duplicate flatpak runtime packages.
Snaps:
Additionally, if you prefer Snaps, Nobara also supports Snaps:
https://wiki.nobaraproject.org/general-usage/snaps/snap-package-managers
However, unlike Flatpaks Nobara will -not- attempt to update any installed snaps alongside system updates.
COPR:
COPR repositories and packages are supported, however we strongly recommend against using COPR packages and repositories unless you know what you are doing.
There are two main problems with packages from 3rd party COPR repositories. The main problem is that when users go to update to a new version of Nobara, they often forget that they've installed packages from a COPR repository. If that repository maintainer has not built packages for the next iteration of Fedora then the user will hit package conflicts which prevent them from updating the system.
Here is an example of where COPR might be bad:
I install 'sunshine' package from someuser's copr repo on Nobara 40.
I then go to upgrade to Nobara 41.
I hit a package conflict issue because someuser has not built sunshine in their repo for Fedora 41, and the current Fedora 40 sunshine package requires some depency version in Fedora 40 that has since been updated in Fedora 41.
Now you can't update unless you remove sunshine.
Instead, if there is a COPR package you need from a repository, as long as the repository is active and has current builds it is recommended that you simply request via Discord or Nobara github that the copr package be added to Nobara.
Terra:
Terra packages are generally safe as they are built on the current and next releases of Fedora and normally don't have conflicts. We enable Terra repositories by default on Nobara.
¶ First steps after installation (continued):
- Keeping the system up to date:
Updating tips: https://wiki.nobaraproject.org/general-usage/troubleshooting/update-system
It is always recommended to use the DNF App Center (Nobara System Update app). While yes, DNF commands do exist, there are several important things that the Nobara System Update app does which are not covered by DNF, including but not limited to package version quirks and corrections, media codec checks, HTPC and handheld Auto-updating, detailed logging during the update process and much more.
As mentioned the Nobara Update System app can be run both via the GUI OR via CLI: nobara-sync
We request users to only use this tool for updating and if they encounter a problem, first consult the Wiki to see if the problem is covered:
https://wiki.nobaraproject.org/
If not, please report it via Discord or the Nobara Github:
https://github.com/Nobara-Project/rpm-sources
At the end of the day it's 100% YOUR system, you can choose to do (or not do) anything we recommend, we're just trying to help you have a good time and not break anything. Linux + Tinkerers + minsinformation between Nobara vs Fedora and how things are done can easily turn a good day into a bad one.
I will also post this in /r/NobaraProject in hopes that it will get stickied and can be regularly updated for newcomers